Ultrasonic Gas Leak Detectors
This detector converts ultrasonic waves to an audible sound so you can find leaks. Unlike typical leak detectors, this unit doesn’t rely only on the presence of a gas to work, making it suitable for a wider range of applications. In addition to gas leaks, it identifies ultrasonic sound caused by failing solenoids, valves, and bearings.
For systems under 10 psi, use the optional ultrasonic sound generator.
Import regulations restrict sales to the listed areas.
Acoustic Imaging Gas Leak Detectors
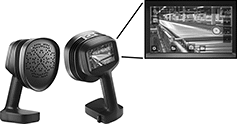
Locate leaks up to 10 times faster than traditional leak-detecting methods. These detectors use 124 microphones to determine the precise location and size of leaks in compressed air and specific gas systems. The screen displays a high-resolution acoustic image that’s overlaid on a digital live shot of your facility to help you visualize the leak. It also displays analytics related to the leak, such as the rate and the potential cost savings of patching your system. You can capture the on-screen view through photos and video to review later. With a built-in flashlight, they remain accurate even in low-light spaces. Light enough to carry with one hand, you can bring these detectors on the go. A 650 ft. range means you can use them from one end of your facility to another, or to detect in hard-to-reach systems.
Connect the detector to your computer using Wi-Fi or the included USB cable to quickly transfer collected data.

| Max. Working Distance, ft. | Measuring Range, kHz | Screen Size | Resolution Range | Data Connection Type | Wt., lbs. | Housing Material | Temp. Range, °F | Environmental Rating | Batteries Included | Container Type | Includes | Features | Each | |
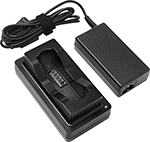
| 650 | 2 to 130 | 5" | 1°-0.125° | Wi-Fi, USB-A | 3.2 | Plastic | 0° to 120° | IP54 | Yes | Plastic Carrying Case | Battery Charger, Charging Cord, Lanyard, USB Drive | Memory Storage, LED Flashlight | 0000000 | 0000000000 |
Ultrasonic Portable Hardness Testers

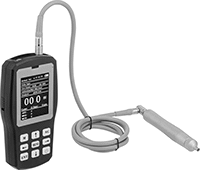
Using ultrasonic vibrations, these testers determine hardness without leaving an indent on hardened materials. They only leave minimal damage on softer metal and work on metal as thin as 0.08”. Use the included test block to determine the right amount of force to apply to your probe. To perform a test, press the diamond tip probe into your material and apply consistent pressure for reliable results. These testers are highly precise and convert measurements between Rockwell, Vickers, and Brinell ratings. Measurements are shown on a backlit digital display, so you can read them even in dark or dimly lit areas. Store up to 2,000 readings with their built-in memory or transfer the data to your PC using the USB port. Small enough to carry, take these testers to your material. Their lithium ion (Li-Ion) battery keeps them running for up to six hours before recharging is required. Energy efficiency requirements restrict sales to the listed areas.
NIST calibrated test blocks are included to help you understand how to properly press the probe to your material for an accurate result. The test blocks can also be used to recalibrate the device. These testers must be calibrated to the specific hardness scale and material being tested. They come pre-calibrated with five combinations: aluminum on the Rockwell B scale, brass on the Rockwell B scale, steel on the Rockwell C and B scales, and steel on the Brinell scale.
Probe | |||||||||||||
|---|---|---|---|---|---|---|---|---|---|---|---|---|---|
| Hardness Measuring Range (For Scale) | Accuracy | Ht. | Wd. | Dia. | Cable Lg. | Min. Material Thick. | For Max. Surface Finish, microinch | Batteries Included | Battery Type | Includes | Cannot Be Sold To | Each | |
For Use On Aluminum, Brass, Bronze, Copper, Alloy Steel, Stainless Steel, Steel | |||||||||||||
| Brinell 75-650 Durometer 26-99 (OO) Leeb 170-960 (D) Rockwell 20-100 (A, B, C) Vickers 80-999 | ±3% | 7" | 3 1/8" | 7/8" | 58" | 0.08" | 400 | Yes | Rechargeable | 5 kgf Probe, Carrying Case, Test Block | CA, OR | 0000000 | 000000000 |
Ultrasonic Thickness Gauges
Measure the thickness of material such as metal and plastic. The ultrasonic probe provides highly accurate readings. This gauge comes with a calibration certificate traceable to NIST that states it has passed a test for accuracy. It also includes a USB cord for connecting to your PC. Use the included ultrasonic gel for maximum surface contact.
Use calibration blocks to calibrate your thickness gauge. All blocks have a serial number and come with a calibration certificate traceable to NIST.
Ultrasonic Painted-Surface Thickness Gauges
Measure the thickness of painted metal without removing the coating. The ultrasonic probe provides highly accurate readings. This gauge comes with a calibration certificate traceable to NIST that states it has passed a test for accuracy. It also includes a USB cord for connecting to your PC. Use the included ultrasonic gel for maximum surface contact.
Use calibration blocks to calibrate your thickness gauge. All blocks have a serial number and come with a calibration certificate traceable to NIST.
Distance-Measuring Modules for Development Boards
Stream distance readings to your development board in real time. Set up these modules near your robotics, production lines, or liquid monitoring systems to capture changing positioning.
Ultrasonic modules use sound pulses to measure distance. They can be used in low lighting. However, they may not be accurate on soft, small, or oddly shaped objects that won’t reflect sound waves properly.

| Sensing Distance | Accuracy | Output Data Frequency, Hz | Input Voltage | Lg. | Wd. | Ht. | Each | |
| 2 cm-4 m | ±0.3 cm | 40 | 5V DC | 1 3/4" | 3/4" | 1/2" | 0000000 | 00000 |


