About Torque Tools
More
Adjustable Torque Wrenches


Set the desired torque and the wrench indicates when it's reached with an audible click and an impulse in the grip. To relieve pressure on the spring and maintain calibration, set torque to the lowest reading on the scale when not in use. These wrenches come with a calibration certificate that is traceable to NIST or UKAS and includes the test measurements that confirm accuracy.
Note: Accuracy ratings do not apply to the lower 20% of the torque range.
Wrenches | |||||||||||
|---|---|---|---|---|---|---|---|---|---|---|---|
Accuracy | Repair Kits | ||||||||||
| Square Drive Size | Torque Range | Graduations | Clockwise | Counterclockwise | Overall Lg. | Material | Grip Material | Each | Each | ||
Ratcheting with Calibration Certificate with Test Data Traceable to NIST Certificate of Calibration | |||||||||||
in.-lbs. | |||||||||||
| 1/4" | 10 to 50 in.-lbs. | 1 in.-lbs. | ±4% | __ | 11 1/4" | Chrome-Plated Steel | __ | 000000000 | 0000000 | 000000000 | 000000 |
in.-lbs., Nm | |||||||||||
| 1/4" | 1.2 to 5.6 Nm 10 to 50 in.-lbs. | 0.5 in.-lbs. 0.06 Nm | ±4% | ±6% | 10" | Chrome-Plated Steel | __ | 000000000 | 000000 | 000000 | 00 |
| 1/4" | 2.3 to 16.9 Nm 20 to 150 in.-lbs. | 1 in.-lbs. 0.12 Nm | ±4% | ±6% | 10" | Chrome-Plated Steel | Rubber | 000000000 | 000000 | 000000 | 00 |
Nm | |||||||||||
| 1/4" | 4 to 20 Nm | 0.2 Nm | ±4% | __ | 10 1/8" | Chrome-Plated Steel | __ | 000000000 | 000000 | 000000000 | 00000 |
Nonratcheting with Calibration Certificate with Test Data Traceable to NIST Certificate of Calibration | |||||||||||
in.-lbs., Nm | |||||||||||
| 1/4" | 1.2 to 5.6 Nm 10 to 50 in.-lbs. | 0.5 in.-lbs. 0.06 Nm | ±4% | ±6% | 10" | Chrome-Plated Steel | __ | 000000000 | 000000 | 000000 | 00 |
| 1/4" | 2.3 to 16.9 Nm 20 to 150 in.-lbs. | 1 in.-lbs. 0.12 Nm | ±4% | ±6% | 10" | Chrome-Plated Steel | Rubber | 000000000 | 000000 | 000000 | 00 |
Quick-Release Adjustable Torque Wrenches

No need to pull the socket off the tool—push a button to release. Set torque and the wrench indicates when it's reached with an audible click and an impulse in the grip. To relieve pressure on the spring and maintain calibration, set torque to the lowest reading on the scale when not in use. Wrenches come with a calibration certificate that is traceable to NIST and includes the test measurements that confirm accuracy.
Note: Accuracy ratings do not apply to the lower 20% of the torque range.
Accuracy | ||||||||||
|---|---|---|---|---|---|---|---|---|---|---|
| Square Drive Size | Torque Range | Graduations | Clockwise | Counterclockwise | Overall Lg. | Ratcheting or Nonratcheting | Material | Grip Material | Each | |
in.-lbs., Nm | ||||||||||
| 1/4" | 2.3 to 16.9 Nm 20 to 150 in.-lbs. | 1 in.-lbs. 0.12 Nm | ±4% | ±6% | 10" | Ratcheting | Chrome-Plated Steel | Plastic | 000000000 | 0000000 |
Electrical-Insulating Adjustable Torque Wrenches

Insulated to protect against accidental contact with live electrical circuits, these wrenches are tested to 1,000 volts to meet IEC 60900. Set torque and the wrench indicates when it's reached with an audible click and an impulse in the grip. To relieve pressure on the spring and maintain calibration, set torque to the lowest reading on the scale when not in use.
Note: Accuracy ratings do not apply to the lower 20% of the torque range.
Calibration certificate traceable to NIST states the product has passed a test for accuracy.
For technical drawings and 3-D models, click on a part number.
Accuracy | |||||||||||
|---|---|---|---|---|---|---|---|---|---|---|---|
| Square Drive Size | Torque Range | Graduations | Clockwise | Counterclockwise | Overall Lg. | Ratcheting or Nonratcheting | Material | Grip Material | Specifications Met | Each | |
Calibration Certification Traceable to NIST | |||||||||||
in.-lbs. | |||||||||||
| 1/4" | 30 to 150 in.-lbs. | 1 in.-lbs. | ±4% | ±6% | 10 1/2" | Ratcheting | Plastic-Coated Steel | Plastic | IEC 60900 | 0000000 | 0000000 |
High-Accuracy Torque-Measuring Wrenches

Trust the precision of your measurements—these wrenches are accurate to ±1%. They display torque as it’s measured and the maximum torque reached. Use to determine fastener torque specifications as well as to identify the torque required to loosen tightened fasteners. To fasten to a specific value, set the desired torque—lights and an audible alarm indicate when target has been reached or exceeded. The display rotates so you can read it at any angle. Wrenches come with a calibration certificate that is traceable to NIST and includes the test measurements that confirm accuracy.
Accuracy | ||||||||||
|---|---|---|---|---|---|---|---|---|---|---|
| Square Drive Size | Torque Range | Graduations | Clockwise | Counterclockwise | Overall Lg. | Material | Grip Material | Batteries Included | Each | |
in.-lbs., ft.-lbs., Nm | ||||||||||
| 1/4" | 7.5 to 75 in.-lbs. 0.63 to 6.25 ft.-lbs. 0.84 to 8.5 Nm | 0.01 in.-lbs. 0.01 ft.-lbs. 0.01 Nm | ±1% | ±1% | 11" | Chrome-Plated Steel | Plastic | Yes | 0000000 | 0000000 |
| 1/4" | 10 to 100 in.-lbs. 0.83 to 8.3 ft.-lbs. 1.1 to 11.1 Nm | 0.01 in.-lbs. 0.01 ft.-lbs. 0.01 Nm | ±1% | ±1% | 11" | Chrome-Plated Steel | Plastic | Yes | 0000000 | 000000 |
Torque-Measuring Wrenches


Measure with an accuracy of ±2.0%. These wrenches display torque as it’s measured and the maximum torque reached. Use to determine fastener torque specifications as well as to identify the torque required to loosen tightened fasteners. To fasten to a specific value, set the desired torque—lights and an audible alarm indicate when target has been reached or exceeded. Wrenches come with a calibration certificate and includes the test measurements that confirm accuracy.
Note: Accuracy ratings do not apply to the lower 20% of the torque range.
Accuracy | |||||||||||
|---|---|---|---|---|---|---|---|---|---|---|---|
| Square Drive Size | Torque Range | Graduations | Clockwise | Counterclockwise | Overall Lg. | Ratcheting or Nonratcheting | Material | Grip Material | Batteries Included | Each | |
in.-lbs., ft.-lbs., Nm | |||||||||||
| 1/4" | 13.2 to 264 in.-lbs. 1.1 to 22 ft.-lbs. 1.5 to 30 Nm | 0.1 in.-lbs. 0.01 ft.-lbs. 0.1 Nm | ±2% | ±3% | 15 5/8" | Ratcheting | Chrome-Plated Steel | Plastic | Yes | 0000000 | 0000000 |
Data-Recording Torque-and-Angle Measuring Wrenches

The most advanced torque wrenches we offer, these tools store and recall up to 1,500 torque and angle measurements. The digital display shows how torque measurements change as you turn the wrench. Use these tools to determine fastener torque specifications as well as to identify the torque required to loosen tightened fasteners. Wrenches have programmable, lockable presets that allow you to set up different torque settings in sequence to ensure correct, reliable operation. Lights, an audible alarm, and a vibration in the handle indicate when target has been reached or exceeded. Tools come with a calibration certificate that is traceable to NIST and includes the test measurements that confirm accuracy.
Note: Accuracy ratings apply to the entire torque range.
For technical drawings and 3-D models, click on a part number.
Accuracy | ||||||||||||
|---|---|---|---|---|---|---|---|---|---|---|---|---|
| Square Drive Size | Torque Range | Graduations | Clockwise | Counterclockwise | O'all Lg. | Ratcheting or Nonratcheting | Flex Range of Motion | Material | Grip Material | Batteries Included | Each | |
in.-lbs., ft.-lbs., Nm | ||||||||||||
| 1/4" | 12 to 240 in.-lbs. 1 to 20 ft.-lbs. 1.4 to 27.2 Nm | 1 in.-lbs. 0.1 ft.-lbs. 0.1 Nm | ±2% | ±3% | 11 5/8" | Ratcheting | 15° | Chrome-Plated Steel | Steel | Yes | 0000000 | 0000000 |
Dial Torque-Measuring Wrenches

A main pointer on the dial shows torque as it’s being applied and a memory pointer indicates the maximum torque reached. Use these wrenches to determine fastener torque specifications as well as to identify the torque required to loosen tightened fasteners. They come with a calibration certificate that is traceable to NIST and includes the test measurements that confirm accuracy.
Note: Accuracy ratings do not apply to the lower 20% of the torque range.
Accuracy | ||||||||||
|---|---|---|---|---|---|---|---|---|---|---|
| Square Drive Size | Torque Range | Graduations | Clockwise | Counterclockwise | Overall Lg. | Ratcheting or Nonratcheting | Material | Grip Material | Each | |
in.-lbs. | ||||||||||
| 1/4" | 0 to 75 in.-lbs. | 1 in.-lbs. | ±2% | ±2% | 9 15/16" | Nonratcheting | Chrome-Plated Steel | Metal | 0000000 | 0000000 |
in.-lbs., Nm | ||||||||||
| 1/4" | 0 to 15 in.-lbs. 0 to 1.7 Nm | 0.5 in.-lbs. 0.05 Nm | ±2% | ±2% | 9 15/16" | Nonratcheting | Chrome-Plated Steel | Metal | 0000000 | 000000 |
| 1/4" | 0 to 30 in.-lbs. 0 to 3.5 Nm | 1 in.-lbs. 0.1 Nm | ±2% | ±2% | 9 15/16" | Nonratcheting | Chrome-Plated Steel | Metal | 0000000 | 000000 |
| 1/4" | 0 to 75 in.-lbs. 0 to 8.4 Nm | 1 in.-lbs. 0.2 Nm | ±2% | ±2% | 9 15/16" | Nonratcheting | Chrome-Plated Steel | Metal | 0000000 | 000000 |
High-Accuracy Horizontal-Scale Torque-Measuring Wrenches

Trust the precision of your measurements—these wrenches are accurate to ±2%. The scale has a main pointer that shows torque as it’s being applied and a memory pointer that indicates the maximum torque reached. Use to determine fastener torque specifications as well as to identify the torque required to loosen tightened fasteners. Wrenches come with a calibration certificate that is traceable to NIST and includes the test measurements that confirm accuracy.
Note: Accuracy ratings do not apply to the lower 20% of the torque range.
For technical drawings and 3-D models, click on a part number.
Accuracy | ||||||||||
|---|---|---|---|---|---|---|---|---|---|---|
| Square Drive Size | Torque Range | Graduations | Clockwise | Counterclockwise | Overall Lg. | Ratcheting or Nonratcheting | Material | Grip Material | Each | |
Ball Grip | ||||||||||
in.-oz. | ||||||||||
| 1/4" | 0 to 32 in.-oz. | 2 in.-oz. | ±2% | ±2% | 6 3/4" | Nonratcheting | Chrome-Plated Steel | Plastic | 0000000 | 0000000 |
| 1/4" | 0 to 80 in.-oz. | 5 in.-oz. | ±2% | ±2% | 6 7/8" | Nonratcheting | Chrome-Plated Steel | Plastic | 0000000 | 000000 |
| 1/4" | 0 to 160 in.-oz. | 10 in.-oz. | ±2% | ±2% | 6 3/4" | Nonratcheting | Chrome-Plated Steel | Plastic | 0000000 | 000000 |
in.-lbs. | ||||||||||
| 1/4" | 0 to 10 in.-lbs. | 0.5 in.-lbs. | ±2% | ±2% | 6 3/4" | Nonratcheting | Chrome-Plated Steel | Plastic | 0000000 | 000000 |
Horizontal-Scale Torque-Measuring Wrenches

Measure with an accuracy of ±7%. The scale's pointer moves to show torque as it's applied. Use these wrenches to determine fastener torque specifications as well as to identify the torque required to loosen tightened fasteners. They are also known as beam torque wrenches.
Note: Accuracy ratings do not apply to the lower 20% of the torque range.
Accuracy | ||||||||||
|---|---|---|---|---|---|---|---|---|---|---|
| Square Drive Size | Torque Range | Graduations | Clockwise | Counterclockwise | Overall Lg. | Ratcheting or Nonratcheting | Material | Grip Material | Each | |
Ball Grip | ||||||||||
in.-lbs., Nm | ||||||||||
| 1/4" | 0 to 80 in.-lbs. 0 to 9 Nm | 2.5 in.-lbs. 0.25 Nm | ±7% | ±7% | 11 1/4" | Nonratcheting | Chrome-Plated Steel | Plastic | 0000000 | 000000 |
Slip-Release Factory-Set Torque Wrenches


These wrenches slip to disengage and stop turning the fastener when the set torque is reached, preventing overtightening. Factory-set wrenches ensure the same torque is reached every time. The torque setting cannot be adjusted. Wrenches come with a calibration certificate traceable to NIST that states the product has passed a test for accuracy.
For technical drawings and 3-D models, click on a part number.
| Square Drive Size | Available Torque Settings, in.-lbs. | Overall Lg. | Material | Grip Material | Each | |
Nonratcheting | ||||||
|---|---|---|---|---|---|---|
Clockwise and Counterclockwise | ||||||
| 1/4" | 2 to 20 | 3 7/8" | Chrome-Plated Steel | Plastic | 00000000 | 0000000 |
| Square Drive Size | Available Torque Settings, ft.-lbs. | Overall Lg. | Material | Grip Material | Each | |
Nonratcheting | ||||||
|---|---|---|---|---|---|---|
Clockwise and Counterclockwise | ||||||
| 1/4" | 0.2 to 1.6 | 4" | Chrome-Plated Steel | Plastic | 00000000 | 0000000 |
| Square Drive Size | Available Torque Setting, Nm | Overall Lg. | Material | Grip Material | Each | |
Nonratcheting | ||||||
|---|---|---|---|---|---|---|
Clockwise and Counterclockwise | ||||||
| 1/4" | 0.3 to 2.2 | 4" | Chrome-Plated Steel | Plastic | 00000000 | 0000000 |
T-Handle Slip-Release Factory-Set Torque Wrenches


Turn sockets from above when there's not room to swing a standard wrench handle. The wrench slips to disengage and stop turning the fastener, preventing overtightening. Factory-set wrenches ensure the same torque is reached every time. The torque setting cannot be adjusted. Wrenches come with a calibration certificate traceable to NIST that states the product has passed a test for accuracy.
For technical drawings and 3-D models, click on a part number.
| Square Drive Size | Available Torque Settings, ft.-lbs. | O'all Lg. | Material | Each | |
Nonratcheting | |||||
|---|---|---|---|---|---|
Clockwise | |||||
| 1/4" | 0.2 to 6.6 | 3 1/2" | Chrome-Plated Steel | 00000000 | 0000000 |
Clockwise and Counterclockwise | |||||
| 1/4" | 0.2 to 6.6 | 3 1/2" | Chrome-Plated Steel | 00000000 | 000000 |
Ratcheting | |||||
Clockwise | |||||
| 1/4" | 0.2 to 4.1 | 3 3/8" | Chrome-Plated Steel | 00000000 | 000000 |
Click-Style Factory-Set Torque Wrenches
Reach the same torque every time with factory-set wrenches that indicate with an audible click and an impulse in the grip when set torque is reached. Wrenches come with a calibration certificate traceable to NIST that states the product has passed a test for accuracy.
Change the torque of these wrenches with adjustment keys (sold separately).
For technical drawings and 3-D models, click on a part number.


Wrenches | Adjustment Keys | Repair Kits | ||||||||
|---|---|---|---|---|---|---|---|---|---|---|
| Square Drive Size | Available Torque Settings, in-lbs. | Clockwise Accuracy | Overall Lg. | Material | Each | Each | Each | |||
Ratcheting | ||||||||||
| 1/4" | 10 to 50 | ±4% | 8" | Chrome-Plated Steel | 00000000 | 0000000 | 000000000 | 000000 | 000000000 | 000000 |
| 1/4" | 30 to 150 | ±4% | 8" | Chrome-Plated Steel | 00000000 | 000000 | 000000000 | 00000 | 000000000 | 00000 |


Wrenches | Adjustment Keys | Repair Kits | ||||||||
|---|---|---|---|---|---|---|---|---|---|---|
| Square Drive Size | Available Torque Settings, ft.-lbs. | Clockwise Accuracy | Overall Lg. | Material | Each | Each | Each | |||
Ratcheting | ||||||||||
| 1/4" | 0.9 to 4.1 | ±4% | 8" | Chrome-Plated Steel | 00000000 | 0000000 | 000000000 | 000000 | 000000000 | 000000 |
| 1/4" | 2.5 to 12.5 | ±4% | 8" | Chrome-Plated Steel | 00000000 | 000000 | 000000000 | 00000 | 000000000 | 00000 |


Torque-Limiting Air-Powered Wrenches


Set torque and the wrench will prevent you from exceeding it. Also known as nutrunners, these tools are commonly used in assembly applications. They have a pin-style (also called positive locking) socket retainer that fits into a matching hole in the socket and provides a secure hold. Wrenches operate at full torque in both clockwise and counterclockwise direction. Use with impact sockets only. Air-powered tools require lubrication to operate properly.
Air Inlet | ||||||||||||
|---|---|---|---|---|---|---|---|---|---|---|---|---|
| Max. Torque, ft.-lbs. | Torque-Limiting Mechanism | No. of Speeds | Max. No-Load Speed, rpm | Average Air Consumption | Pipe Size | Thread Type | Gender | For Air Hose ID | Overall Lg. | Weight, lbs. | Each | |
1/4" Square Drive | ||||||||||||
| 3.8 | Motor Stops | 1 | 700 | 13 cfm @ 90 psi | 1/8 | NPT | Female | 1/4" | 12 1/2" | 1.8 | 0000000 | 000000000 |
Light Duty Air-Powered Impact Wrenches
These tools are suitable for general shop, maintenance, and automotive work. Wrenches operate at full torque in both clockwise and counterclockwise direction. Use with impact sockets only. Air-powered tools require lubrication to operate properly.
Ring-style socket retainer allows quick socket changes—pull the socket off the retainer and push on another one.


Air Inlet | ||||||||||||||
|---|---|---|---|---|---|---|---|---|---|---|---|---|---|---|
| Max. Torque, ft.-lbs. | No. of Speeds | Max. No-Load Speed, rpm | Average Air Consumption | Pipe Size | Thread Type | Gender | For Air Hose ID | Overall Lg. | Weight, lbs. | Socket Retainer Style | Includes | Each | ||
1/4" Square Drive | ||||||||||||||
| A | 55 | 1 | 14,500 | Not Rated | 1/4 | NPT | Female | 3/8" | 6 7/8" | 1 1/2 | Ring | 1/4" Square Drive Size Sockets (Inch): 3/16", 1/4", 3/8", 1/2", 9/16" 1/4" Square Drive Size Sockets (Metric): 4 mm, 6 mm, 10 mm, 12 mm, 14 mm | 0000000 | 0000000 |
| For Wrench Style | Socket Retainer Style | Each | |
For 1/4" Square Drive | |||
|---|---|---|---|
| A | Ring | 0000000 | 00000 |
Changeable-Head Torque Wrenches
Change heads to use these tools as an open-end, box, square drive, or hex-key wrench. When the set torque is reached, these wrenches indicate with an audible click and a momentary release. To reverse torque-limiting direction, remove head, turn handle over, and reattach head. The handle and head combination you choose may have different maximum torque values. Do not exceed the lower value.
Ratcheting square drive head allows you to turn fasteners in tight spaces without removing and repositioning the tool.
For technical drawings and 3-D models, click on a part number.
Square-Drive Torque Screwdrivers

Attach a socket to the 1/4" square drive tip to turn hex nuts and hex head screws. Turn the collar to adjust torque. When set torque is reached, these drivers signal with an audible click. Drivers come with a calibration certificate that is traceable to NIST and includes the test measurements that confirm accuracy.
Note: Accuracy ratings apply to the entire torque range.
Accuracy | Material | |||||||||||
|---|---|---|---|---|---|---|---|---|---|---|---|---|
| Square Drive Size | Torque Range | Graduations | Clockwise | Counterclockwise | Torque-Limiting Direction | Certification | Overall Lg. | Shaft | Handle | Container Type | Each | |
Click Torque Limiter | ||||||||||||
in.-lbs. | ||||||||||||
| 1/4" | 5-35 in.-lbs. | 0.5 in.-lbs. | ±4% | ±4% | Clockwise and Counterclockwise | Calibration Certificate with Test Data Traceable to NIST Certificate of Calibration | 7" | Steel | Steel | Plastic Case | 0000000 | 0000000 |
Square Drive Torque-Measuring Screwdrivers

Attach a socket to the 1/4" square drive tip to turn hex nuts and hex head screws. The dial on these drivers shows how torque measurements change as you turn. Use to fasten to a specific torque, determine fastener torque specifications, and identify the torque required to loosen tightened fasteners. To use with screwdriver bits, add a bit adapter. Drivers come with a calibration certificate that is traceable to NIST and includes the test measurements that confirm accuracy.
Drivers with memory pointer indicate the maximum torque reached.
Drivers with 1/4" female square drive in handle allow you to attach a T-handle or ratchet to the end for extra leverage when applying high torque.
Note: The accuracy ratings do not apply to the lower 20% of the torque range.
Accuracy | Material | ||||||||||
|---|---|---|---|---|---|---|---|---|---|---|---|
| Square Drive Size | Torque Range | Graduations | Clockwise | Counterclockwise | Certification | O'all Lg. | Shaft | Handle | Features | Each | |
in.-oz., in.-lbs. | |||||||||||
| 1/4" | 0-24 in.-oz 0-1.5 in.-lbs. | 0.5 in.-oz .0312 in.-lbs. | ±2% | ±2% | Calibration Certificate with Test Data Traceable to NIST Certificate of Calibration | 7 3/4" | Steel | Plastic | Memory Pointer | 00000000 | 0000000 |
| 1/4" | 0-48 in.-oz. 0-3 in.-lbs. | 0.0625 in.-lbs. 1 in.-oz. | ±2% | ±2% | Calibration Certificate with Test Data Traceable to NIST Certificate of Calibration | 9" | Steel | Plastic | Memory Pointer | 00000000 | 000000 |
| 1/4" | 0-192 in.-oz 0-12 in.-lbs. | 4 in.-oz. 0.25 in.-lbs. | ±2% | ±2% | Calibration Certificate with Test Data Traceable to NIST Certificate of Calibration | 8 3/4" | Steel | Plastic | Memory Pointer | 00000000 | 000000 |
| 1/4" | 0-384 in.-oz 0-24 in.-lbs. | 8 in.-oz. 0.5 in.-lbs. | ±2% | ±2% | Calibration Certificate with Test Data Traceable to NIST Certificate of Calibration | 8 3/4" | Steel | Plastic | Memory Pointer | 00000000 | 000000 |
| 1/4" | 0-480 in.-oz 0-30 in.-lbs. | 16 in.-oz. 1 in.-lbs. | ±2% | ±2% | Calibration Certificate with Test Data Traceable to NIST Certificate of Calibration | 8 3/4" | Steel | Plastic | Memory Pointer | 00000000 | 000000 |
in.-oz. | |||||||||||
| 1/4" | 0-8 in.-oz. | 0.25 in.-oz | ±2% | ±2% | Calibration Certificate with Test Data Traceable to NIST Certificate of Calibration | 9" | Steel | Plastic | Memory Pointer | 00000000 | 000000 |
in.-lbs. | |||||||||||
| 1/4" | 0-50 in.-lbs. | 1 in.-lbs. | ±2% | ±2% | Calibration Certificate with Test Data Traceable to NIST Certificate of Calibration | 8 3/4" | Steel | Plastic | Memory Pointer 1/4" Female Square Drive in Handle | 00000000 | 000000 |
| 1/4" | 0-75 in.-lbs. | 1 in.-lbs. | ±2% | ±2% | Calibration Certificate with Test Data Traceable to NIST Certificate of Calibration | 8 3/4" | Steel | Plastic | Memory Pointer 1/4" Female Square Drive in Handle | 00000000 | 000000 |
Square Drive Torque Tool Testers

Check the accuracy of torque wrenches and screwdrivers—place your tool onto the tester with the included square drive connector and turn. The main pointer shows torque as it's measured; the memory pointer shows the maximum torque reached. Use these testers with hand tools only.
Note: For the most accurate performance, the maximum torque you apply should fall near the middle of the tester’s torque range.
For technical drawings and 3-D models, click on a part number.
Accuracy | Mounting Holes | |||||||||||||
|---|---|---|---|---|---|---|---|---|---|---|---|---|---|---|
| Square Drive Size | Torque Range | Graduations | Torque-Measuring Direction | Clockwise | Counterclockwise | Lg. | Wd. | Ht. | Material | Mounting Fasteners Included | No. of | Dia. | Each | |
With Calibration Certificate Traceable to NIST | ||||||||||||||
in.-lbs. | ||||||||||||||
| 1/4" | 6 to 30 in.-lbs. | 0.5 in.-lbs. | Clockwise and Counterclockwise | ±2% | ±2% | 8" | 4" | 2 1/4" | Steel | No | 4 | 1/4" | 0000000 | 0000000 |
| 1/4" | 15 to 75 in.-lbs. | 1 in.-lbs. | Clockwise and Counterclockwise | ±2% | ±2% | 8" | 4" | 2 1/4" | Steel | No | 4 | 1/4" | 0000000 | 000000 |
| 1/4" | 20 to 100 in.-lbs. | 2 in.-lbs. | Clockwise and Counterclockwise | ±2% | ±2% | 8" | 4" | 2 1/4" | Steel | No | 4 | 1/4" | 0000000 | 000000 |
High-Accuracy Torque Tool Testers
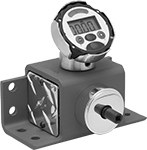
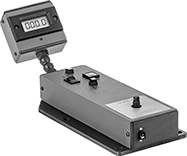
Accurate to within ±1%, these torque testers are often used to check the accuracy of torque wrenches and screwdrivers on assembly lines. They come with a calibration certificate traceable to NIST that states they’ve passed a test for accuracy. To test, place your torque wrench or screwdriver onto the tester with the included square drive connection and turn. These testers display torque as it's measured and the maximum torque reached. For accuracy when testing click-style wrenches, they also show the first torque peak reached. They’re not for use with impact or pulse tools.
Note: For the most accurate readings, the maximum torque you're applying should fall near the middle of the tester's torque range.
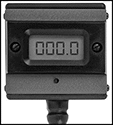
Bench-top testers can be mounted to your work surface. Those with a gooseneck display can be bent until you can clearly see the test results. Mount these testers to your workbench with a mounting bracket (sold separately). Or, carry them where they’re needed using the included case.
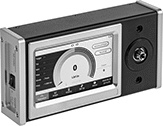
Portable testers are lightweight and easy to move around your facility. Their touch-screen display makes it easier to navigate through different menus than testers with a digital-screen display. To view data in a CSV file, pop out the tester’s SD card and plug it into your computer. You can also transfer data by connecting the tester directly to your computer with the USB cord. To use these testers with nonimpact power tools, they include at least one socket screw adapter. These testers meet ISO 17025, so they’ve been checked in a laboratory that was evaluated for accuracy.
Accuracy | Mounting Holes | |||||||||||||||
|---|---|---|---|---|---|---|---|---|---|---|---|---|---|---|---|---|
| Square Drive Size | Torque Range | Graduations | Torque-Measuring Direction | Clockwise | Counterclockwise | For Tool Type | Ht. | Wd. | Dp. | Mounting Fasteners Included | No. of | Dia. | Batteries Included | Includes | Each | |
With Calibration Certificate with Test Data Traceable to NIST Certificate of Calibration | ||||||||||||||||
in.-lbs., ft.-lbs., Nm | ||||||||||||||||
| 1/4" | 5 to 50 in.-lbs. 0.4 to 4.17 ft.-lbs. 0.56 to 5.65 Nm | 0.01 in.-lbs. 0.01 ft.-lbs. 0.01 Nm | Clockwise and Counterclockwise | ±1% | ±1% | Hand Tools Only | 4 1/2" | 6" | 6" | No | 8 | 3/8" | Yes | Female Drive Adapter | 0000000 | 000000000 |
Accuracy | Mounting Holes | ||||||||||||||
|---|---|---|---|---|---|---|---|---|---|---|---|---|---|---|---|
| Square Drive Size | Torque Range | Graduations | Torque-Measuring Direction | Clockwise | Counterclockwise | For Tool Type | Ht. | Wd. | Dp. | Mounting Fasteners Included | No. of | Dia. | Includes | Each | |
With Calibration Certificate with Test Data Traceable to NIST Certificate of Calibration | |||||||||||||||
in.-oz., cNm | |||||||||||||||
| 1/4" | 10 to 100 in.-oz. 7 to 70.6 cNm | 1 in.-oz. 0.1 cNm | Clockwise and Counterclockwise | ±0.5% | ±0.5% | Hand Tools Only | 2 1/2" | 4 1/2" | 14 1/2" | No | 6 | 5/16" | Carrying Case, Female Drive Adapter | 0000000 | 000000000 |
| 1/4" | 40 to 400 in.-oz. 28 to 280 cNm | 1 in.-oz. 1 cNm | Clockwise and Counterclockwise | ±0.5% | ±0.5% | Hand Tools Only | 2 1/2" | 4 1/2" | 14 1/2" | No | 6 | 5/16" | Carrying Case, Female Drive Adapter | 0000000 | 00000000 |
in.-lbs., dNm | |||||||||||||||
| 1/4" | 5 to 50 in.-lbs. 5.6 to 56 dNm | 1 in.-lbs. 0.1 dNm | Clockwise and Counterclockwise | ±0.5% | ±0.5% | Hand Tools Only | 2 1/2" | 4 1/2" | 14 1/2" | No | 6 | 5/16" | Carrying Case, Female Drive Adapter | 0000000 | 00000000 |
| 1/4" | 10 to 100 in.-lbs. 11.3 to 113 dNm | 1 in.-lbs. 0.1 dNm | Clockwise and Counterclockwise | ±0.5% | ±0.5% | Hand Tools Only | 2 1/2" | 4 1/2" | 14 1/2" | No | 6 | 5/16" | Carrying Case, Female Drive Adapter | 0000000 | 00000000 |

Mounting Holes | ||||||||
|---|---|---|---|---|---|---|---|---|
| Material | Wd. | Ht. | Dp. | Mounting Fasteners Included | No. Of | Dia. | Each | |
| Steel | 4 1/2" | 2 1/2" | 8 3/4" | No | 6 | 5/16" | 0000000 | 0000000 |
Accuracy | ||||||||||||
|---|---|---|---|---|---|---|---|---|---|---|---|---|
| Square Drive Size | Torque Range | Graduations | Torque-Measuring Direction | Clockwise | Counterclockwise | For Tool Type | Ht. | Wd. | Dp. | Includes | Each | |
With Calibration Certificate with Test Data Traceable to NIST Certificate of Calibration | ||||||||||||
in.-lbs., kgf-cm, cNm | ||||||||||||
| 1/4" | 0.1 to 1 in.-lbs. 0.1 to 1.2 kgf-cm 1.1 to 11.3 cNm | 0.001 in.-lbs. 0.001 kgf-cm 0.001 cNm | Clockwise and Counterclockwise | ±1% | ±1% | Hand Tools and Nonimpact Power Tools | 2 1/8" | 8" | 4 1/4" | 3-ft Long USB Cable, 8 GB SD Card, AC Adapter, Carrying Case, Socket Screw Adapter (1.5 mm Hex) | 00000000 | 000000000 |
| 1/4" | 0.3 to 3 in.-lbs. 0.3 to 3.5 kgf-cm 3.4 to 33.9 cNm | 0.001 in.-lbs. 0.001 kgf-cm 0.001 cNm | Clockwise and Counterclockwise | ±1% | ±1% | Hand Tools and Nonimpact Power Tools | 2 1/8" | 8" | 4 1/4" | 3-ft Long USB Cable, 8 GB SD Card, AC Adapter, Carrying Case, Two Socket Screw Adapters (1.5 mm Hex) | 00000000 | 00000000 |
| 1/4" | 0.5 to 5 in.-lbs. 0.6 to 5.8 kgf-cm 5.6 to 56.5 cNm | 0.001 in.-lbs. 0.001 kgf-cm 0.001 cNm | Clockwise and Counterclockwise | ±1% | ±1% | Hand Tools and Nonimpact Power Tools | 2 1/8" | 8" | 4 1/4" | 3-ft Long USB Cable, 8 GB SD Card, AC Adapter, Carrying Case, Two Socket Screw Adapters (2.5 mm Hex) | 00000000 | 00000000 |
Rotary Torque Testers
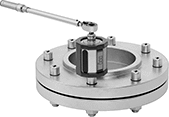

Monitor torque as you apply it—these testers mount between your torque tool and your fastener. Engage the fastener to track both torque and the angle of rotation for each crank of your tool (snug torque) before you've reached the final torque. This gives you a better idea if fasteners are consistently tightened than measuring torque alone. These testers are often used with nutrunners and click-style torque wrenches in the automotive and aerospace industries. Store up to 999 maximum torque (peak) and rotation values, including the date and time of each test, or transfer to your computer to view in an Excel file. CE marked, they meet European safety standards.
For the most accurate readings, the maximum torque you're applying should fall near the middle of the tester's torque range. They are not for use with impact tools.
Testers with a USB connection transfer data directly to your computer with the included cord. These testers last up to 10 hours on a single charge.
Testers with a Bluetooth connection wirelessly transmit data to a computer as you measure. You can also remotely set snug torque, or when these testers starting measuring the torque applied with each rotation. They last up to 8 hours on a single charge with Bluetooth on and 10 hours with it off.
For technical drawings and 3-D models, click on a part number.
Accuracy | ||||||||||||
|---|---|---|---|---|---|---|---|---|---|---|---|---|
| Square Drive Size | Torque Range | Graduations | Clockwise | Counterclockwise | Lg. | OD | Features | Battery Type | Battery Charger Included | Includes | Each | |
USB-B Data Connection | ||||||||||||
| 1/4" | 280 to 1,400 in.-oz. 17.6 to 88 in.-lbs. 1.5 to 7.3 ft.-lbs. 20 to 100 kgf-cm 0.2 to 1 kgf-m 200 to 1,000 cNm 2 to 10 Nm | 1 in.-oz. 0.1 in.-lbs. 0.01 ft.-lbs. 0.1 kgf-cm 0.001 kgf-m 1 cNm 0.01 Nm | ±1% | ±1% | 2 15/16" | 1 13/16" | Plug Cover, Torque Measurement Memory | Rechargeable | Yes | 6 1/2-ft. Long USB Cord, AC Adapter | 0000000 | 000000000 |
Bluetooth Data Connection | ||||||||||||
| 1/4" | 280 to 1,400 in.-oz. 17.6 to 88 in.-lbs. 1.5 to 7.3 ft.-lbs. 20 to 100 kgf-cm 0.2 to 1 kgf-m 200 to 1,000 cNm 2 to 10 Nm | 1 in.-oz. 0.1 in.-lbs. 0.01 ft.-lbs. 0.1 kgf-cm 0.001 kgf-m 1 cNm 0.01 Nm | ±1% | ±1% | 2 15/16" | 1 15/16" | Plug Cover, Torque Measurement Memory | Rechargeable | Yes | AC Adapter | 0000000 | 00000000 |
Data-Recording Torque Gauges
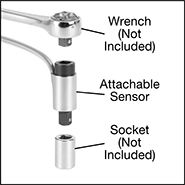
Wrench-attachable sensors fit between your wrench and socket. Use with hand tools only.
Hand-turned sensors don't require a tool; place into your socket and turn them with your hand.

Accuracy | |||||||
|---|---|---|---|---|---|---|---|
| Square Drive Size (Gender) | Torque Range | Torque-Measuring Direction | Clockwise | Counterclockwise | Cord Lg., ft. | Each | |
in.-oz., in.-lbs., ft.-lbs., Nm, cNm, m-kg, cm-kg | |||||||
| 1/4" (Female) × 1/4" (Male) | 80 to 800 in.-oz. 5 to 50 in.-lbs. 0.417 to 4.17 ft.-lbs. 0.565 to 5.65 Nm 56.5 to 565 cNm 0.058 to 0.576 m-kg 5.76 to 57.6 cm-kg | Clockwise and Counterclockwise | ±1% | ±1% | 4 | 0000000 | 0000000 |
| 1/4" (Female) × 1/4" (Male) | 320 to 3,200 in.-oz. 20 to 200 in.-lbs. 1.67 to 16.7 ft.-lbs. 2.26 to 22.6 Nm 226 to 2,260 cNm 0.23 to 2.3 m-kg 23 to 230 cm-kg | Clockwise and Counterclockwise | ±1% | ±1% | 4 | 0000000 | 000000 |

Accuracy | |||||||
|---|---|---|---|---|---|---|---|
| Square Drive Size (Gender) | Torque Range | Torque-Measuring Direction | Clockwise | Counterclockwise | Cord Lg., ft. | Each | |
in.-oz., in.-lbs., ft.-lbs., Nm, cNm, m-kg, cm-kg | |||||||
| 1/4" (Male) | 2 to 20 in.-oz. 0.125 to 1.25 in.-lbs. 0.01 to 0.104 ft.-lbs. 0.014 to 0.141 Nm 1.41 to 14.1 cNm 0.001 to 0.014 m-kg 0.144 to 1.44 cm-kg | Clockwise and Counterclockwise | ±2% | ±2% | 4 | 0000000 | 0000000 |
| 1/4" (Male) | 16 to 160 in.-oz. 1 to 10 in.-lbs. 0.083 to 0.833 ft.-lbs. 0.113 to 1.13 Nm 11.3 to 113 cNm 0.012 to 0.115 m-kg 1.15 to 11.5 cm-kg | Clockwise and Counterclockwise | ±2% | ±2% | 4 | 0000000 | 000000 |


