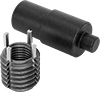
We will reply to your message within an hour.
Screw an insert onto these tools and drive them a quarter to half-turn below the material's surface. They're compatible with helical inserts that have a prong.
Place the tip of these tools into installed inserts and push down to trigger the spring-loaded punch to break off the prong.
Place the tip of these tools into an insert and strike a light blow to the tool’s head. Then turn the tools counterclockwise with pressure to extract the insert.
Screw an insert onto these tools and drive them a quarter to half-turn below the material’s surface.
Thread these tools into an insert and turn counterclockwise to extract.
Attach these installation tips to a soldering iron. The tips transfer heat from the soldering iron to the insert, softening the surrounding plastic. When the plastic cools, it solidifies around the insert to keep it secure.
Extract heat-set inserts by attaching these tips to a soldering iron. The tips transfer heat from the soldering iron to the insert, softening the surrounding plastic to loosen the insert so it can be removed.
Place the tip of these tools into an insert and strike them with a hammer to drive the keys into the material. They’re compatible with Keensert® inserts.
Install key-locking inserts, including Keensert®-style inserts.
Leave hand fatigue behind when installing lots of aligning key-locking inserts.
Use these installation bits with power drills and drill presses as an alternative to a screwdriver for fast installation.
These installation bits can be used with power drills and drill presses as an alternative to a hex driver for fast installation.
Compatible with Tap-Lok inserts.
Strike these tools with a hammer or mallet to press threaded inserts into composites.
Compatible with push-to-expand and Dodge inserts, these tools push down a plate inside the insert so the insert expands and stays secure in the surrounding material.
Set swage-locking inserts into place.
Strike these tools with a hammer to drive key-locking insert blanks into your material.
Made of spark-inhibiting materials, these wrenches are also corrosion resistant.
Also known as bung wrenches, these tools are used to install and remove screw-in drum plugs.
Instead of carrying around a large drum plug wrench, keep these sockets in your toolbox and turn with a ratchet wrench.
When the set torque is reached, these wrenches slip to disengage and stop overtightening.
Inserts come with a through-hole tap and installation tool.
Assortments include various sizes of helical inserts and a tap, a drill bit, and an installation tool for each thread size.
Kits include helical inserts, a tap, and an installation tool.
These kits have short-, normal-, and long-reach inserts, an installation tool, and a tap.
These inserts come with an installation tool. Drive the keys into the surrounding material for a more secure hold than thread-locking inserts.
A closed-end tap, drill bit, and installation bit are included with these inserts.
Assortments include various sizes of inserts, a soldering iron, a ceramic insulation tube, and installation tips.
These have a go gauge on one end and a no-go gauge on the other end.
These gauges come with a certificate of calibration traceable to NIST that states they’ve passed a test for accuracy.
A notch on the handle indicates when the internal NPT threads you’re checking are in tolerance.
Ensure the accuracy of NPT thread measurements—these gauges come with a certificate of calibration traceable to NIST that states they’ve passed a test for accuracy.
Find the true center of threaded holes to precisely align and measure parts.
Tap these tools once or twice with a hammer to install fittings.