Angle Identifiers

These gauges have 18 leaves that swing out when you want to quickly check an angle. They're more convenient than a protractor when identifying 45° and smaller angles. The 14 1/2° angle leaf measures half the Acme standard 29° angle.
Folded | |||||||
|---|---|---|---|---|---|---|---|
| Manufacturer | Manufacturer Model Number | Angles Measured | Material | Lg. | Wd. | Each | |
| Starrett | 466 | 1°, 2°, 3°, 4°, 5°, 7°, 8°, 9°, 10°, 12°, 14°, 14 1/2°, 15°, 20°, 25°, 30°, 35°, 45° | Steel | 4 3/16" | 1 1/16" | 0000000 | 0000000 |
Starrett Chamfer Gauges

Make sure the top diameter of a chamfered hole isn’t too big or too small. These gauges are often used as a quality control check after milling, drilling, and reaming. Press the three-blade probe into a chamfered hole and twist slightly to center. Once the blades touch the hole’s slopes, the dial will display the diameter. Zero set these gauges on a flat, ground surface when needed.
Choose a gauge with a measuring angle that’s greater than or equal to the angle of the chamfered hole you’re measuring.
For technical drawings and 3-D models, click on a part number.
Dial | ||||||||||
|---|---|---|---|---|---|---|---|---|---|---|
| Measuring Range | Accuracy | Measuring Increments | Probe Type | Material | Dia. | Face Color | Contact Point Material | Manufacturer Model Number | Each | |
0°-90° Measuring Angle | ||||||||||
| 0"-0.38" | ±0.002" | 0.001" | Three Blade | Black-Oxide Steel | 2 1/4" | White | Steel | 683-1Z | 000000000 | 0000000 |
| 0"-0.5" | ±0.002" | 0.001" | Three Blade | Black-Oxide Steel | 2 1/4" | White | Steel | 683-2Z | 000000000 | 000000 |
| 0"-1" | ±0.002" | 0.001" | Three Blade | Black-Oxide Steel | 2 1/4" | White | Steel | 683-3Z | 000000000 | 000000 |
| 1"-2" | ±0.002" | 0.001" | Three Blade | Black-Oxide Steel | 2 1/4" | White | Steel | 683-4Z | 000000000 | 000000 |
90°-127° Measuring Angle | ||||||||||
| 0"-0.38" | ±0.002" | 0.001" | Three Blade | Black-Oxide Steel | 2 1/4" | White | Steel | 684-1Z | 000000000 | 000000 |
| 0"-0.5" | ±0.002" | 0.001" | Three Blade | Black-Oxide Steel | 2 1/4" | White | Steel | 684-2Z | 000000000 | 000000 |
| 0"-1" | ±0.002" | 0.001" | Three Blade | Black-Oxide Steel | 2 1/4" | White | Steel | 684-3Z | 000000000 | 000000 |
| 1"-2" | ±0.002" | 0.001" | Three Blade | Black-Oxide Steel | 2 1/4" | White | Steel | 684-4Z | 000000000 | 000000 |
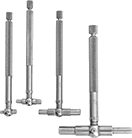
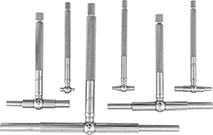
Starrett Telescoping Bore Gauge Sets


A different measuring range on each gauge makes these sets handy for checking a variety of hole sizes. Each gauge has spring-loaded contacts on the probe, which expand inside holes to measure diameter. Often used for general checks, these sets can make sure that engine cylinders, machine components, and turbines don’t deviate in roundness, which could lead to wear and inefficiency if undetected. Since the gauges reach into holes farther than calipers and inside-hole micrometers, they make it easier to inspect deep holes.
Once the contacts expand inside the hole, turn the screw on the handle to lock the contacts in place. To find the bore diameter, use a micrometer to measure the distance across the contacts.
| Number of Gauges | Measuring Range | Max. Dp. Measured | Probe Type | Material | Includes | Manufacturer Model Number | Each | |
| 4 | 5/16"-2 1/8" | 2" | Telescoping | Steel | One gauge with 5/16"-1/2" measuring range One gauge with 1/2"-3/4" measuring range One gauge with 3/4"-1 1/4" measuring range One gauge with 1 1/4"-2 1/8" measuring range | S579GZ | 000000 | 0000000 |
| 6 | 5/16"-6" | 2" | Telescoping | Steel | One gauge with 5/16"-1/2" measuring range One gauge with 1/2"-3/4" measuring range One gauge with 3/4"-1 1/4" measuring range One gauge with 1 1/4"-2 1/8" measuring range One gauge with 2 1/8"-3 1/2" measuring range One gauge with 3 1/2"-6" measuring range | S579HZ | 000000 | 000000 |
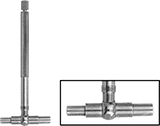
Starrett Telescoping Bore Gauges

Versatile enough for general checks, these bore gauges have spring-loaded contacts on the end of their probe to expand inside holes. They’re often used in vehicle repairs and to test parts, such as engine cylinders, for deviations in roundness that could lead to wear. Since they reach father into holes than calipers and inside-hole micrometers, these gauges make it easier to measure a deep hole’s diameter.
Once the contacts expand inside the hole, turn the screw on the handle to lock the contacts in place. To find the bore diameter, use a micrometer to measure the distance across the contacts.
| Measuring Range | Max. Dp. Measured | Probe Type | Material | Handle Lg. | Manufacturer Model Number | Each | |
| 5/16"-1/2" | 2" | Telescoping | Steel | 2 7/8" | 579A | 000000 | 000000 |
| 1/2"-3/4" | 2" | Telescoping | Steel | 2 7/8" | 579B | 000000 | 00000 |
| 3/4"-1 1/4" | 2" | Telescoping | Steel | 2 7/8" | 579C | 000000 | 00000 |
| 1 1/4"-2 1/8" | 2" | Telescoping | Steel | 2 7/8" | 579D | 000000 | 00000 |
| 2 1/8"-3 1/2" | 2" | Telescoping | Steel | 2 7/8" | 579E | 000000 | 00000 |
| 3 1/2"-6" | 2" | Telescoping | Steel | 4" | 579F | 000000 | 00000 |
Starrett Small-Bore Gauge Sets


Check a variety of hole, groove, and slot diameters. Each gauge in these sets has a different measuring range. The end of these gauges has a 360° contact surface that’s easier to center in tight spaces than anvils or spring-loaded contacts. Use them to measure slots and bores in precision parts, such as electronics, where small size deviations can cause inefficiencies.
Insert the probe into a bore and turn the knob on the handle to expand the contacts. To find the bore diameter, use a micrometer to measure the distance across the contacts.
Full-ball gauges are best for deep bores. They’re less likely than half-ball gauges to tilt within the bore, which helps to avoid skewed measurements caused by placing the gauge off-center.
Half-ball gauges are best for measuring near the bottom of flat, shallow bores.
| Measuring Range | Material | Number of Gauges | Includes | Manufacturer Model Number | Each | |
Full-Ball Small Bore | ||||||
|---|---|---|---|---|---|---|
| 0.125"-0.5" | Steel | 4 | One full-ball gauge with 0.125"-0.200" measuring range and 2 1/2" max. depth One full-ball gauge with 0.200"-0.300" measuring range and 2 1/2" max. depth One full-ball gauge with 0.300"-0.400" measuring range and 2.7" max. depth One full-ball gauge with 0.400"-0.500" measuring range and 3" max. depth | S829EZ | 000000 | 0000000 |
Half-Ball Small Bore | ||||||
| 0.125"-0.5" | Steel | 4 | One half-ball gauge with 0.125"-0.200" measuring range and 2" max. depth One half-ball gauge with 0.200"-0.300" measuring range and 3" max. depth One half-ball gauge with 0.300"-0.400" measuring range and 3" max. depth One half-ball gauge with 0.400"-0.500" measuring range and 3" max. depth | S831EZ | 000000 | 000000 |
Starrett Small-Bore Gauges


Measure the diameter of small holes, grooves, and recesses. The end of these gauges has a 360° contact surface that’s easier to center in tight spaces than anvils or spring-loaded contacts. Use them to measure slots and bores in precision parts, such as electronics, where small size deviations can cause inefficiencies.
Insert the probe into a bore and turn the knob on the handle to expand the contacts. To find the bore diameter, use a micrometer to measure the distance across the contacts.
Full-ball gauges are best for deep bores. They’re less likely than half-ball gauges to tilt within the bore, which helps to avoid skewed measurements caused by placing the gauge off-center.
Half-ball gauges are best for measuring near the bottom of flat, shallow bores.
| Measuring Range | Max. Dp. Measured | Material | Manufacturer Model Number | Each | |
Full-Ball Small Bore | |||||
|---|---|---|---|---|---|
| 0.125"-0.2" | 2 1/2" | Steel | 829A | 000000 | 000000 |
| 0.2"-0.3" | 2 1/2" | Steel | 829B | 000000 | 00000 |
| 0.3"-0.4" | 2.7" | Steel | 829C | 000000 | 00000 |
| 0.4"-0.5" | 3" | Steel | 829D | 000000 | 00000 |
Half-Ball Small Bore | |||||
| 0.125"-0.2" | 2" | Steel | 831A | 000000 | 00000 |
| 0.2"-0.3" | 3" | Steel | 831B | 000000 | 00000 |
| 0.3"-0.4" | 3" | Steel | 831C | 000000 | 00000 |
| 0.4"-0.5" | 3" | Steel | 831D | 000000 | 00000 |
Starrett Small-Bore Dial Gauges

The dial on these gauges displays size deviations in real time. These gauges measure small slots and bores in precision parts, such as electronics, where even small size deviations can cause inefficiencies. Thanks to its full-ball design, the end of these gauges makes 360° contact inside the bore, so it's easier to center in tight spaces than anvil or spring-loaded contacts. This symmetrical ball is also less likely to tilt within the bore than half-ball gauges, which helps to avoid skewed measurements from improper placement.
Insert the probe into a bore and turn the knob on the handle to expand the contacts. To check size deviations, set the desired measurement with a ring gauge, bore gauge calibrator, micrometer, or caliper. The dial will display the magnitude of variation from the set measurement. To find the bore diameter, use a micrometer to measure the distance across the contacts.
For technical drawings and 3-D models, click on a part number.
Dial | |||||||||||||
|---|---|---|---|---|---|---|---|---|---|---|---|---|---|
| Measuring Range | Accuracy | Measuring Increments | Max. Dp. Measured | Probe Type | Measurement per Dial Revolution | Material | Industry Designation | Dia. | Face Color | Number of Anvils | Manufacturer Model Number | Each | |
| 0.107"-0.266" | ±0.0001" | 0.0001" | 0.8" | Full Ball | 0.01" | Steel | AGD Group 1 | 1 5/8" | White | 5 | 82AZ | 0000000 | 000000000 |
| 0.217"-0.594" | ±0.0001" | 0.0001" | 1.7" | Full Ball | 0.01" | Steel | AGD Group 1 | 1 5/8" | White | 6 | 82BZ | 0000000 | 00000000 |
| 0.56"-1.565" | ±0.0001" | 0.0001" | 5" | Full Ball | 0.01" | Steel | AGD Group 1 | 1 5/8" | White | 8 | 82CZ | 0000000 | 00000000 |
Starrett Dial Bore Gauges

Check a hole’s diameter and detect out-of-roundness problems. Often used to test engine cylinders and machine components, these gauges catch issues with roundness and taper. They have the most common design for bore gauges, which is a two-point contact system. The dial head’s highly sensitive jeweled bearings resist wear for a long service life.
To use these bore gauges, set a baseline measurement with a ring gauge, calibrator, micrometer, or caliper. The variation from the set measurement displays on the dial right away, so there’s no need for conversions. Swap out the anvil to measure bores of different diameters. Marked by size, the anvils are quick to spot and select.
Dial | ||||||||||||||
|---|---|---|---|---|---|---|---|---|---|---|---|---|---|---|
| Measuring Range | Accuracy | Measuring Increments | Max. Dp. Measured | Probe Type | Measurement per Dial Revolution | Material | Industry Designation | Dia. | Face Color | Number of Anvils | Manufacturer Model Number | Includes | Each | |
| 0.7"-1.5" | ±0.0005" | 0.0005" | 6" | Interchangeable Anvil | 0.05" | Steel | AGD Group 2 | 2 1/4" | White | 10 | 3089Z-131-715J | __ | 00000000 | 0000000 |
| 1.4"-2.4" | ±0.0005" | 0.0005" | 6" | Interchangeable Anvil | 0.05" | Steel | AGD Group 2 | 2 1/4" | White | 6 | 3089Z-131-1424J | __ | 00000000 | 000000 |
| 2"-6" | ±0.0005" | 0.0005" | 6" | Interchangeable Anvil | 0.05" | Steel | AGD Group 2 | 2 1/4" | White | 11 | 3089Z-131-26J | 2" Lg. Extension | 00000000 | 000000 |
Starrett Dial Bore Gauge Sets

Test for size deviations across a range of hole diameters. These sets include 3 gauges and over 25 anvils marked by size for quick changes. Use them to test engine cylinders, machine components, and other parts for issues with roundness and taper. They have a two-point contact system, which is the most common design for bore gauges. For a long service life, the jeweled bearings in each dial head resist wear, and a plastic cover protects the head from scratches and drops.
Check size deviations by first setting the desired measurement with a ring gauge, bore gauge calibrator, micrometer, or caliper. The dial will display the magnitude of variation from the set measurement.
Dial | ||||||||||||||
|---|---|---|---|---|---|---|---|---|---|---|---|---|---|---|
| Measuring Range | Accuracy | Measuring Increments | Max. Dp. Measured | Probe Type | Measurement per Dial Revolution | Material | Industry Designation | Dia. | Face Color | Number of Anvils | Features | Manufacturer Model Number | Each | |
| 0.7"-6" | ±0.0005" | 0.0005" | 6" | Interchangeable Anvil | 0.05" | Steel | AGD Group 2 | 2 1/4" | White | 27 | Laser-Marked Anvils | S3089Z-131-6J | 0000000 | 0000000 |
| 50mm-160mm | ±0.01 mm | 0.01mm | 150mm | Interchangeable Anvil | 0.1mm | Steel | AGD Group 2 | 2 1/4" | Yellow | 26 | Laser-Marked Anvils | S3089MZ-181-160J | 0000000 | 000000 |
Starrett Electronic Pistol-Grip Bore Gauge Sets


Check the diameter of holes with the pull of a trigger. These Starrett sets have everything you need for one-handed measurements—a pistol-grip gauge, heads for varying diameters, and setting rings. Thanks to its pistol grip, you can reach the gauge into awkward spots, such as those overhead. The pistol grip also gives you precise control using just your fingertips instead of your whole hand. Unlike dial bore gauges, you can measure right away, no baseline measurement required. You can even set upper and lower tolerances for quick go/no-go tests. The LCD display has lights and arrows to show if the hole falls within your set tolerance. Rotate the display to read results at the angle you need.
Since the gauge has three contact points, it’s more accurate than a typical bore gauge with two contact points. The probe centers itself, so it’s easier to detect issues with roundness, a common check in quality control tests. To stay accurate, the gauge has alarms to warn you about problems that could skew readings, such as a low battery, a contaminated probe, and test setting errors. Use the included setting rings to calibrate your gauge.
With a zero-set button, you can start measuring at any point. Zero-position memory, also known as absolute (ABS) positioning, retains the measuring position when the gauge is off. Connect the gauge to your computer, smartphone, or other device via Bluetooth or the SPC data output to monitor and analyze data in real time.
| Measuring Range | Accuracy | Measuring Increments | Max. Dp. Measured | Probe Type | Material | Batteries Included | No. of Anvils | No. of Heads | Includes | Features | Manufacturer Model Number | Each | |
With SPC Data Output—Bluetooth Connection | |||||||||||||
|---|---|---|---|---|---|---|---|---|---|---|---|---|---|
| 0.25"-0.75" 6 mm-20 mm | ±0.00015" ±0.004 mm | 0.00005" 0.001 mm | 2 3/8" | Self-Centering Three Point | Steel | Yes | 3 | 5 | Setting Rings | Alarms, Go/No-Go Measurement, Swiveling Display, Zero-Position Memory (ABS), Zero-Set Button | S781BXTHZ | 0000000 | 000000000 |
| 0.75"-4" 20 mm-100 mm | ±0.0002" ±0.005 mm | 0.00005" 0.001 mm | 3 3/8" | Self-Centering Three Point | Steel | Yes | 3 | 6 | Setting Rings | Alarms, Go/No-Go Measurement, Swiveling Display, Zero-Position Memory (ABS), Zero-Set Button | S781BXTJZ | 0000000 | 00000000 |
| 4"-8" 100 mm-200 mm | ±0.0003" ±0.007 mm | 0.00005" 0.001 mm | 4" | Self-Centering Three Point | Steel | Yes | 3 | 4 | Setting Rings | Alarms, Go/No-Go Measurement, Swiveling Display, Zero-Position Memory (ABS), Zero-Set Button | S781BXTGZ | 0000000 | 00000000 |


