Rockwell Hardness Calibration Test Blocks

Make sure your hardness testers are accurately calibrated. Blocks are marked with their corresponding Rockwell hardness and a serial number.
All blocks come with a calibration certificate traceable to NIST that states they've passed a test for accuracy.
Rockwell Hardness Testing File Sets

Set includes six files and a chart to convert to Vickers scale. It is an economical way to determine the hardness of steel on the Rockwell C-scale. Handles are marked with Rockwell hardness values. If a file can scratch your material, then your material is softer than the file. If a file cannot scratch your material, then your material is harder than the file.
| Includes | Material | Tip Shape | Each | |
For Use On Steel | ||||
|---|---|---|---|---|
| Rockwell C40 File, Rockwell C45 File, Rockwell C50 File, Rockwell C55 File, Rockwell C60 File, Rockwell C65 File, Vickers Scale Conversion Chart | Steel | Curved | 00000000 | 0000000 |
Rockwell Hardness Testing Files

An economical way to determine the hardness of steel on the Rockwell C-scale. Handles are marked with Rockwell hardness values. If a file can scratch your material, then your material is softer than the file. If a file cannot scratch your material, then your material is harder than the file.
| For Rockwell Hardness Scale | Material | Tip Shape | Choose a Hardness | Each | |
For Use On Steel | |||||
|---|---|---|---|---|---|
| C | Steel | Curved | 00000000 | 000000 | |
Small Spot Rockwell Hardness Testers

A microscope measures the indentation made by a small diameter ball penetrator to provide a hardness reading.
Ball Indenter | ||||||||||
|---|---|---|---|---|---|---|---|---|---|---|
| For Rockwell Hardness Scale | Hardness Measuring Range | Accuracy | Ht. | Dia. | Material | Dia. | Batteries Included | Includes | Each | |
For Use On Alloy Steel | ||||||||||
| C | 20-65 | ±1.5 | 7 1/2" | 7/8" | Carbide | 1/16" | Yes | 60X Illuminated Microscope with Calibrated Scale | 0000000 | 000000000 |
Portable Rockwell Hardness Testers
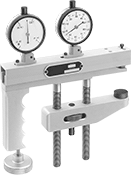
Test hardness right on your production floor. Unlike benchtop testers, these portable ones don’t require you to move large or hard-to-access parts. They use an indenter to measure the hardness of aluminum, brass, and steel. These testers can be used at any angle without affecting accuracy.
For heat-treated material harder than Rockwell C20, use the optional C-scale diamond indenter.
Throat | Ball Indenter | ||||||||||||||
|---|---|---|---|---|---|---|---|---|---|---|---|---|---|---|---|
| For Rockwell Hardness Scale | Hardness Measuring Range | Measuring Increments | Accuracy | Ht. | Wd. | Dp. | Ht. | Dp. | Dial Dia. | Material | Dia. | Includes | Specifications Met | Each | |
For Use On Aluminum, Brass, Alloy Steel, Low-Carbon Steel | |||||||||||||||
| A, B, C, D, E, F, G, H, K | 0-100 | 1 | ±1.5 | 11" | 8" | 1 1/2" | 4 1/2" | 2 1/4" | 2 1/4" | Carbide | 1/16" | Three Anvils (Convex, V, Flat) | ASTM E110 | 0000000 | 000000000 |
| Optional C-Scale Diamond Indenter | 0000000 | Each | 0000000 |
Pressure-Grip Rockwell Hardness Testers

Operate these testers with one hand. Squeeze the handles until the penetrator contacts the test material and a reading appears on the dial indicator.
Throat | ||||||||||||
|---|---|---|---|---|---|---|---|---|---|---|---|---|
| For Rockwell Hardness Scale | Hardness Measuring Range | Measuring Increments | Accuracy | Lg. | Ht. | Width | Ht. | Dp. | For Max. Material Thick. | Includes | Each | |
For Use On Aluminum, Brass, Low-Carbon Steel | ||||||||||||
| B | 20-100 | 4 | ±1 | 8" | 3" | 1" | 3/8" | 1" | 1/4" | Extra Indenter, Test Strip | 0000000 | 000000000 |
For Use On Aluminum | ||||||||||||
| E | 25-110 | 4.25 | ±1 | 8" | 3" | 1" | 3/8" | 1" | 1/4" | Extra Indenter, Test Strip | 0000000 | 00000000 |
Benchtop Rockwell Hardness Testers
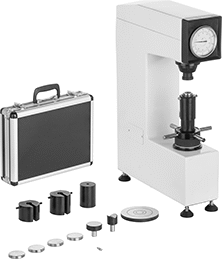
Bring material right to your bench to measure its hardness. These testers use a carbide indenter to take accurate Rockwell hardness readings every time. They come with a calibration certificate traceable to NIST that states they’ve passed a test for accuracy. With a durable metal body, these testers stand up to many environments, from heat treat facilities to workshops to inspection labs. They show readings on a dial—no need to hook them up to a power source.
These testers come with indenters for different scales, three anvils, four test blocks, and a case to store accessories. Use the included cover to shield them from dust when they’re not in use.
Throat | Ball Indenter | ||||||||||||||
|---|---|---|---|---|---|---|---|---|---|---|---|---|---|---|---|
| For Rockwell Hardness Scale | Hardness Measuring Range | Measuring Increments | Accuracy | Ht. | Wd. | Dp. | Ht. | Dp. | Dial Dia. | Material | Dia. | Includes | Specifications Met | Each | |
For Use On Aluminum, Brass, Bronze, Copper, Iron, Alloy Steel, Low-Carbon Steel, Steel, Titanium | |||||||||||||||
| A, B, C, D, F, G | 20-100 | 1 | ±1 | 30" | 8 1/2" | 20" | 6 5/8" | 6 1/2" | 4" | Carbide | 1/16" | C-Scale Diamond Indenter, Ball Indenter, Three Anvils (Two Flat, One V), Four Test Blocks, Storage Case | ASTM E18 | 0000000 | 000000000 |
Individual Test Bars for Brinell Hardness Testers

| Accuracy | Lg. | Ht. | Wd. | Choose a Hardness | Each | |
| ±2 | 6" | 9/16" | 9/16" | Brinell 106, Brinell 111, Brinell 114, Brinell 117, Brinell 121, Brinell 124, Brinell 127, Brinell 131, Brinell 135, Brinell 138, Brinell 142, Brinell 147, Brinell 151, Brinell 156, Brinell 160, Brinell 165, Brinell 170, Brinell 176, Brinell 182, Brinell 188, Brinell 194, Brinell 200, Brinell 207, Brinell 212, Brinell 217, Brinell 223, Brinell 229, Brinell 235, Brinell 241, Brinell 248, Brinell 255, Brinell 262, Brinell 269, Brinell 277, Brinell 285, Brinell 293, Brinell 302, Brinell 311, Brinell 321, Brinell 331, Brinell 341, Brinell 352, Brinell 363, Brinell 375, Brinell 388, Brinell 401, Brinell 415, Brinell 429, Brinell 444, Brinell 461, Brinell 477, Brinell 495, Brinell 514, Brinell 534, Brinell 578 | 000000 | 000000 |
Ball Indenters for Brinell Hardness Tests
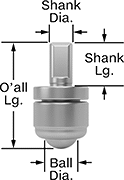
A key component of Brinell hardness testers, these ball indenters are hard enough to make impressions on most metal. Made of carbide, they won’t deform as they press into hard material. Shallow indentations mean a material is hard and deep indentations show that it is soft. Use the diameter of the indentations created by these balls as part of the calculation to find your material’s hardness rating. These ball indenters meet ISO 6506 and ASTM E10 standards for Brinell hardness testing. The shank diameter is a standard size for bench-top Brinell hardness testers.
2.5 mm diameter ball indenters are a good choice when testing material with limited space for measuring or material that is thin and may fracture under heavy loads. They make less contact when indenting your material surface than larger diameter indenters.
10 mm diameter ball indenters are the most commonly used and work well for testing soft material that might deform under heavy loads. They have a large contact area when indenting your material surface, so they distribute the applied load over a larger surface area than smaller diameter indenters. This means there is less stress and pressure at the indentation site.
For technical drawings and 3-D models, click on a part number.
Brinell Hardness Testers
Determine the hardness of very hard steel. To use, slide a test bar into the tester, place the tester on your surface, and hit with a hammer; a steel ball will make an impression. Measure the impression with the 20X microscope and use the computing disc to determine hardness.
Brinell Hardness Calibration Test Blocks
Check your hardness tester for accuracy against a block with a known hardness rating. Each block is tested according to ASTM E10, which checks the hardness at five locations along the block. They include a certificate that lists the block’s actual hardness, as well as each of the five measurements taken during the test. Blocks also include a NIST-traceable certificate that states they’ve passed a test for accuracy.
Each block is marked with their Brinell hardness rating and a serial number.
For technical drawings and 3-D models, click on a part number.
Digital Scopes for Brinell Hardness Testers
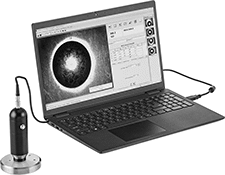

Finding your Brinell hardness doesn’t have to be so hard—these scopes scan and measure indents, then calculate the hardness for you. Accurate and efficient, these scopes replace the need for bulky microscopes and manually measuring and calculating hardness. Connect these scopes to your computer and use the included software to see a live image of the indent on your screen. You can zoom in 4X and adjust the focus to capture a wide range of indent diameters. To fine tune the automatic measurement, simply drag your cursor. Use the software to set test parameters, convert the value to other hardness scales, and validate the test results. The software also marks any measurements that fall out of your set specifications. When you’re finished, you can generate a customizable Microsoft Word or Excel report for your records.
| For Ball Indenter Dia., mm | Hardness Measuring Range | Focus Type | Camera Megapixels | Resolution | Number of Lenses | Ht. | Dia. | Housing Material | Computer Compatibility | Includes | Each | |
For Use On Aluminum, Brass, Bronze, Cast Iron, Iron, Alloy Steel, Stainless Steel, Steel | ||||||||||||
|---|---|---|---|---|---|---|---|---|---|---|---|---|
| 0.8-6 | 8-650 | Adjustable | 1.3 | 0.0001 | 2 | 4 3/4" | 1 1/2" | Aluminum | PC | Carrying Case, One Calibrated Test Block, Software, USB Cable | 0000000 | 000000000 |
Ultrasonic Portable Hardness Testers
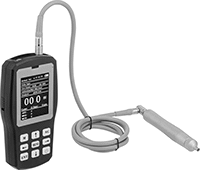
Using ultrasonic vibrations, these testers determine hardness without leaving an indent on hardened materials. They only leave minimal damage on softer metal and work on metal as thin as 0.08”. Use the included test block to determine the right amount of force to apply to your probe. To perform a test, press the diamond tip probe into your material and apply consistent pressure for reliable results. These testers are highly precise and convert measurements between Rockwell, Vickers, and Brinell ratings. Measurements are shown on a backlit digital display, so you can read them even in dark or dimly lit areas. Store up to 2,000 readings with their built-in memory or transfer the data to your PC using the USB port. Small enough to carry, take these testers to your material. Their lithium ion (Li-Ion) battery keeps them running for up to six hours before recharging is required. Energy efficiency requirements restrict sales to the listed areas.
NIST calibrated test blocks are included to help you understand how to properly press the probe to your material for an accurate result. The test blocks can also be used to recalibrate the device. These testers must be calibrated to the specific hardness scale and material being tested. They come pre-calibrated with five combinations: aluminum on the Rockwell B scale, brass on the Rockwell B scale, steel on the Rockwell C and B scales, and steel on the Brinell scale.
Probe | |||||||||||||
|---|---|---|---|---|---|---|---|---|---|---|---|---|---|
| Hardness Measuring Range (For Scale) | Accuracy | Ht. | Wd. | Dia. | Cable Lg. | Min. Material Thick. | For Max. Surface Finish, microinch | Batteries Included | Battery Type | Includes | Cannot Be Sold To | Each | |
For Use On Aluminum, Brass, Bronze, Copper, Alloy Steel, Stainless Steel, Steel | |||||||||||||
| Brinell 75-650 Durometer 26-99 (OO) Leeb 170-960 (D) Rockwell 20-100 (A, B, C) Vickers 80-999 | ±3% | 7" | 3 1/8" | 7/8" | 58" | 0.08" | 400 | Yes | Rechargeable | 5 kgf Probe, Carrying Case, Test Block | CA, OR | 0000000 | 000000000 |
Durometer Hardness Testers


Measure the hardness of flat materials, such as plastic, rubber, and laminate. For more information about durometer scales, please see the bottom of About Rubber.
Style 2 testers have a narrow base for access to confined areas. You can hold them in your hand.
Style 3 testers come with a calibration certificate traceable to NIST that states they've passed a test for accuracy.
Testers with maximum-reading indicator hold the highest reading until reset.
Mount these testers to an optional operating stand (sold separately) to make sure they’re parallel to your sample for accurate readings and repeatability.
Testers | Operating Stands | |||||||||||||
|---|---|---|---|---|---|---|---|---|---|---|---|---|---|---|
| For Durometer Hardness Scale | Hardness Measuring Range | Measuring Increments | Accuracy | Ht. | Wd. | Dp. | Dia. | Min. Material Thick. | Specifications Met | Features | Each | Each | ||
For Use On Plastic, Rubber, Laminate | ||||||||||||||
Style 1 | ||||||||||||||
| A | 0-100 | 1 | ±1 | 4" | 2 1/4" | 1 3/4" | __ | 1/4" | ASTM D2240 | Maximum-Reading Indicator | 000000 | 000000000 | 00000000 | 000000000 |
| D | 0-100 | 1 | ±1 | 4" | 2 1/4" | 1 3/4" | __ | 1/4" | ASTM D2240 | Maximum-Reading Indicator | 000000 | 00000000 | 00000000 | 00000000 |
Style 2 | ||||||||||||||
| A | 0-100 | 1 | ±1 | 4" | 2 1/4" | 1 3/4" | __ | 1/4" | ASTM D2240 | Maximum-Reading Indicator | 00000000 | 00000000 | 00000000 | 00000000 |
| D | 0-100 | 1 | ±1 | 4" | 2 1/4" | 1 3/4" | __ | 1/4" | ASTM D2240 | Maximum-Reading Indicator | 00000000 | 00000000 | 00000000 | 00000000 |
| O | 0-100 | 1 | ±1 | 4" | 2 1/4" | 1 3/4" | __ | 1/4" | ASTM D2240 | Maximum-Reading Indicator | 00000000 | 00000000 | 00000000 | 00000000 |
| OO | 0-100 | 1 | ±2 | 4" | 2 1/4" | 1 3/4" | __ | 1/4" | ASTM D2240 | __ | 00000000 | 00000000 | 00000000 | 00000000 |
Style 3 | ||||||||||||||
| A | 0-100 | 1 | ±1 | 6 1/8" | 2 1/4" | 1" | __ | 1/4" | ASTM D2240 | __ | 00000000 | 000000 | 00000000 | 00000000 |
| D | 0-100 | 1 | ±1 | 6 1/8" | 2 1/4" | 1" | __ | 1/4" | ASTM D2240 | __ | 00000000 | 000000 | 00000000 | 00000000 |
| O | 0-100 | 1 | ±1 | 6 1/8" | 2 1/4" | 1" | __ | 1/4" | ASTM D2240 | __ | 00000000 | 000000 | 00000000 | 00000000 |
| OO | 0-100 | 1 | ±2 | 6 1/8" | 2 1/4" | 1" | __ | 1/4" | ASTM D2240 | __ | 00000000 | 000000 | 00000000 | 00000000 |
Style 4 | ||||||||||||||
| A | 0-100 | 1 | ±1 | 4 1/2" | __ | __ | 1/2" | 1/4" | __ | Maximum-Reading Indicator | 00000000 | 000000 | 000000 | 00 |
| D | 0-100 | 1 | ±1 | 4 1/2" | __ | __ | 1/2" | 1/4" | __ | Maximum-Reading Indicator | 00000000 | 000000 | 000000 | 00 |
Digital Durometer Hardness Testers


Measure the hardness of flat materials with a digital display. For more information about durometer scales, please see the bottom of About Rubber.
These testers come with a calibration certificate traceable to NIST that states they’ve passed a test for accuracy. A maximum-reading indicator holds the highest reading until reset. Use the USB/RS-232 port for direct connection to your PC.
Testers for Shore M durometers take accurate readings on materials as thin as 0.05". Use them to take measurements of areas that are too small for durometer readings with a Shore A scale tester.
Mount the tester to an operating stand (sold separately) to ensure it is perfectly parallel to the sample. This reduces error and gives accurate, repeatable readings.
Testers | Operating Stands | ||||||||||||
|---|---|---|---|---|---|---|---|---|---|---|---|---|---|
| For Durometer Hardness Scale | Hardness Measuring Range | Measuring Increments | Accuracy | Ht. | Wd. | Dp. | Min. Material Thick. | Batteries Included | Features | Each | Each | ||
For Use On Plastic, Rubber, Laminate | |||||||||||||
| A | 0-100 | 0.1 | ±1 | 6 1/8" | 2 1/2" | 1 5/8" | 1/4" | Yes | Maximum-Reading Indicator, Tolerance-Setting High/Low Buttons, USB and RS-232 Connectivity | 00000000 | 000000000 | 00000000 | 000000000 |
| D | 0-100 | 0.1 | ±1 | 6 1/8" | 2 1/2" | 1 5/8" | 1/4" | Yes | Maximum-Reading Indicator, Tolerance-Setting High/Low Buttons, USB and RS-232 Connectivity | 00000000 | 00000000 | 00000000 | 00000000 |
| M | 0-100 | 0.1 | ±4 | 6 1/8" | 2 1/2" | 1 5/8" | 1/16" | Yes | Maximum-Reading Indicator, Tolerance-Setting High/Low Buttons, USB and RS-232 Connectivity | 000000000 | 00000000 | 0000000 | 00000000 |
For Use On Rubber, Foam | |||||||||||||
| OO | 0-100 | 0.1 | ±2 | 6 1/8" | 2 1/2" | 1 5/8" | 1/4" | Yes | Maximum-Reading Indicator, Tolerance-Setting High/Low Buttons, USB and RS-232 Connectivity | 000000000 | 00000000 | 00000000 | 00000000 |
For Use On Rubber | |||||||||||||
| O | 0-100 | 0.1 | ±1 | 6 1/8" | 2 1/2" | 1 5/8" | 1/4" | Yes | Maximum-Reading Indicator, Tolerance-Setting High/Low Buttons, USB and RS-232 Connectivity | 000000000 | 00000000 | 00000000 | 00000000 |
Durometer Hardness Test Block Sets

Confirm your durometer hardness tester is taking accurate readings. Use your tester on these blocks to make sure the durometer readings match the block. The blocks come with a calibration certificate traceable to NIST to ensure their accuracy.
| For Durometer Hardness Scale | Lg. | Wd. | Dp. | Includes | Container Type | Each | |
| A | 2" | 2" | 1/4" | Seven 2" x 2" Test Blocks (Durometer 30A-90A) | Carrying Case | 0000000 | 0000000 |
| D | 2" | 2" | 1/4" | Three 2" x 2" Test Blocks (Durometer 20D-80D) | Carrying Case | 0000000 | 000000 |
| M | 2" | 2" | 1/4" | Seven 2" x 2" Test Blocks (Durometer 30M-90M) | Carrying Case | 0000000 | 000000 |
| OO | 2" | 2" | 1/4" | Three 2" x 2" Test Blocks (Durometer 30OO-70OO) | Carrying Case | 0000000 | 000000 |
O-Ring Durometer Hardness Testers
Test the hardness of thin and irregularly shaped plastic, rubber, and laminate parts, such as O-rings. These testers can be used on products where the surface area is too small for accurate durometer readings with a standard Shore A tester, such as the rounded surface of O-rings. They include O-ring fixtures that hold five standard-sized O-rings in place during testing. These testers are also capable of measuring materials as thin as 0.05″, about the thickness of a credit card. On the display, they’ll show the highest reading until they’re reset. They include a calibration certificate traceable to NIST that states they’ve passed a test for accuracy.
Use the included test blocks to practice taking accurate measurements at the right pressure against your workpiece. Send your measurement data directly to your PC using the USB port.

| For O-Ring Wd. | For Durometer Hardness Scale | Hardness Measuring Range | Measuring Increments | Accuracy | Min. Material Thick. | Max. Display Rotation Angle | Batteries Included | Features | Includes | Each | |
For Use On Plastic, Rubber, Laminate | |||||||||||
|---|---|---|---|---|---|---|---|---|---|---|---|
| 1/16", 3/32", 1/8", 3/16", 1/4" | M | 0-100 | 0.1" | ±4 | 1/16" | 270° | Yes | Maximum-Reading Indicator, Tolerance-Setting High/Low Buttons, USB and RS-232 Connectivity | Digital Durometer Hardness Tester for M Hardness Scale, Seven 2" x 2" Test Blocks (Durometer M), Five O-Ring Fixtures, Operating Stand, Set Plug | 0000000 | 000000000 |
| For Durometer Hardness Scale | Hardness Measuring Range | Measuring Increments | Accuracy | Ht. | Wd. | Dp. | Min. Material Thick. | Max. Display Rotation Angle | Batteries Included | Specifications Met | Features | Each | |
For Use On Plastic, Rubber, Laminate | |||||||||||||
|---|---|---|---|---|---|---|---|---|---|---|---|---|---|
| M | 0-100 | 0.1 | ±4 | 6 1/8" | 2 1/2" | 1 5/8" | 1/16" | 270° | Yes | ASTM D2240 | Maximum-Reading Indicator, Tolerance-Setting High/Low Buttons, USB and RS-232 Connectivity | 000000000 | 000000000 |
| For Durometer Hardness Scale | Hardness Measuring Range | Lg. | Wd. | Dp. | Includes | Container Type | Each | |
| M | 30-90 | 2" | 2" | 1/4" | Seven 2" x 2" Test Blocks (Durometer 30M-90M) | Carrying Case | 0000000 | 0000000 |
Portable Digital Hardness Testers
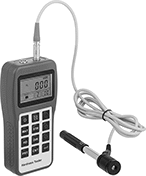
Quickly test large parts or metal bar stock with our most precise hardness testers. These testers are portable and can be brought to facilities and jobsites to test items that are too large to move. While some hardness testers only work on one type of metal, these testers work on most metals. They have a rebound hammer that bounces back after impact—the distance it rebounds indicates the hardness of your surface. To obtain accurate readings, steel and other hard metals must be at least 1” thick and aluminum and other soft metals must be at least 3” thick.
Convert your measurements between Rockwell, Vickers, Brinell, or Shore hardness ratings. Your readings will show on a backlit digital display so you can test even in low light. Store up to 100 measurements with their built-in memory or transfer the data to your PC using the USB port.
Probe | ||||||||||
|---|---|---|---|---|---|---|---|---|---|---|
| Hardness Measuring Range (For Scale) | Accuracy | Ht. | Wd. | Dia. | Cable Lg. | Min. Material Thick. | Batteries Included | Includes | Each | |
For Use On Aluminum, Brass, Bronze, Copper, Cast Iron, Iron, Alloy Steel, Stainless Steel, Steel | ||||||||||
| Brinell 93-650 Durometer 0-100 (A, D, OO) Leeb 100-950 (D) Rockwell 20-100 (B, C) Vickers 83-976 | ±0.5% | 1 1/4" | 2 7/8" | 3/32" | 58" | 1" | Yes | Carrying Case, Cleaning Brush, Test Block | 0000000 | 000000000 |
Scratch-Resistance Testers


Determine the relative hardness of resins, film, lacquer, and paint by testing their resistance to scratches by graphite pencils. The pencils are calibrated to specific lead grades for hardness. The lowest hardness value of the pencil that mars the material is the material’s relative hardness. Flatten the tip of the pencil lead with the included 400 grit sandpaper, then insert the pencil into the tester. As you push the tester over your material, the pencil is dragged across the surface at a constant pressure. These testers are often used in the development of synthetic resins. They meet ASTM D3363 for testing the hardness of coatings.
Testers | Replacement Pencils | |||||||||||
|---|---|---|---|---|---|---|---|---|---|---|---|---|
| Lead Grade | Lg. | Wd. | Ht. | Material | Weight, g | Includes | Specifications Met | Features | Each | Each | ||
For Use On Film, Lacquer, Paint, Resin | ||||||||||||
| 9B, 8B, 7B, 6B, 5B, 4B, 3B, 2B, B, HB, F, H, 2H, 3H, 4H, 5H, 6H, 7H, 8H, 9H | 4" | 2" | 2" | Steel | 750 | 20 Pencils (1 of each grade), Pencil Sharpener, Plastic Carrying Case, Sandpaper | ASTM D3363 | Level | 0000000 | 0000000 | 0000000 | 000000 |


